Showing posts with label Teens. Show all posts

Tuesday, April 8, 2014

Paper Bag Notebook

While prowling through Pinterest I came across this neat post about 5 minute book binding by Brittany Watson Jepsen.  It took me a little more than 5 minutes to make mine, but with a little practice I can see how a person could easily whip one of the bad boys up in that short amount of time.  I decided to use this in my Teen Art Club.  The best part about these little notebooks is that there's NO GLUE!  I swear my teens make a bigger mess with glue than the preschoolers.  :-)    


I followed Brittany's tutorial.  She has great step by step picture instructions.  I had brown paper lunch bags in my supplies closet to use for the covers.  She forgoes scissors and tears her paper using the edge of the ruler.  My skill with that technique is not quite up to par yet, so I resorted to using scissors.  
The sewing part for the binding is easy to figure out.  The teens should not have a problem with this task. 


Using colored pencils I added some fun Aztec designs to me cover.  Now I have this cute little notebook to doodle in or take notes.
Enjoy!

Thursday, December 12, 2013

Glittered Diamond Ornament

Here's a fun craft I recently did with my Teen Art Club.  We made diamond ornaments using cardstock and the template below. I used this template here.  After some trial and error I decided it was easier to print the template directly on some thicker cardstock.  
The teens thought it would be fun to add glitter to the diamonds-I agreed.  We used Elmer's glue and applied thin layers to small sections at a time adding glitter as we went.  The paper warped slightly, but the dried stiff.  It's very important to use a SMALL amount of glue.  Mod Podge would work to, but I only have a matte finish and didn't want to lose the sparkle of the glitter.
Here's what the glued together diamond looks like before glitter.
And here's the glittered out diamond!  If you want to make this into an ornament poke a small whole into the top of the diamond and slip thread or thin fish line into it and tape secure on the underside.  Glue your diamond shut with the string hanging out of the top.
Enjoy!

Wednesday, November 27, 2013

3-D Paper Tree

I found this little guy on Pinterest.  There's an awesome photo tutorial here.  I plan to make this with my teen art club and use them to decorate our gingerbread house display next month.  These are quick and easy to make and you can use all sorts of paper.  My first attempt is below and I made that using regular copier paper.  All you need to do is make sure you start off with a square, fold the paper according to the directions and snip the sides with a pair of scissors. 

Enjoy!

Thursday, October 24, 2013

DIY Paper Pinwheel

After much searching on Pinterest and attempting many different methods, I found a great post about making paper pinwheels.  These will make great decorations and are simple enough for teens and older kids to make in a program.  I've already shown my finished to a couple of teens today and they are excited to decorate the Teen Lounge with paper pinwheels!
Here's what you will need:
  • Paper (any kind will work.  I used colored copier paper because that is what I had on hand)
  • Scissors
  • Pencil
  • Ruler
  • Glue stick
  • Paper clips
To make the large pinwheel I used three pieces of 81/2"x11" paper.  Take a piece of paper and fold it accordion style along the short end, like the picture below, until it's completely folded,.  Do this to all three pieces.

Once your pieces of paper are folded, fold each one in half and glue the middle pieces together.  I secured mine with paper clips while the glue dried.
Now that you have three fan-like pieces, glue them together side by side, to create a circle. Secure with pins.  This is your first pinwheel!
While that pinwheel is drying, cut three 4" squares out of different colored paper.  Fold and glue these together like the first pinwheel.
Glue the small pinwheel to the large pinwheel.
Now, you can have some fun with what you put on the middle.  I decided to go the easy route with this one and printed out some free tags from Chic Tags.  Add some ribbon to the back to hang from the ceiling or a wall and you're done.
Enjoy!

Tuesday, October 22, 2013

Paper Mache Pumpkin

I bought small, brown paper mache pumpkins for kids to color with markers and add glitter to for an evetn I did at the library.  I have some leftover pumpkins and have been dreaming up all the fun things I can do with them.  I decided to continue on with the paper mache route and use orange and yellow tissue paper.  

What you need:
  • Orange and yellow tissue paper (or any colors you'd like)
  • Mod Podge
  • Small paint brush
  • Paper mache pumpkin


Cut your tissue paper into one inch strips and then cut the strips into one inch squares.  I did not measure, just a rough guess.  The pieces do not need to be perfect..

Using the small paintbrush add a thin layer of Mod Podge to the pumpkin.  Place a piece of tissue paper on the Mod Podged area and use the paint brush to smooth the paper down.  I started at the top and worked around in a circle until the entire pumpkin was cover.  Once you are satisfied with your pumpkin, give it a nice top coat of Mod Podge to seal everything down.  I used a matte finish on my pumpkin so it's not too shiny.
I'm toying with the idea of adding some chunky glitter to this pumpkin.  Sometimes glitter just adds a nice touch, and by sometimes, I mean all the time!
Enjoy!!

Tuesday, July 16, 2013

Mason Jar Terrariums

I must be one crazy Librarian to do a project like this, but it was so much fun.  The teens loved it!  It's a bit on the messy side, but the end results are adorable.  For these terrariums I used mason jars and small Cacti.
I was able to purchase the mason jars for about $0.75 each, the Cacti were $2.99 each, and the figurines I had on hand at the library.  Everything else was purchased from a garden store.  
What you will need:
  • Charcoal (for drainage/mold)
  • Soil
  • Small rocks (for drainage)
  • Small plant (I used Cactus)
  • Small figures to place in jar
  • Tongs
  • A lot of patience!

Place a small amount of charcoal at the bottom of the mason jar.  Place a scoop of soil on top of that.  Take a handful of small rocks and put them in next, cover with another scoop of soil.  Remove your plant from any containers and break the roots up.  Using your tongs, place the plant inside the mason jar.  Work it down into the dirt so that the plant can stand up.  Using the tongs again place any figures or other objects (stones,shells, beads, etc.) 
Here is what the teens came up with today.  We made a couple to decorate the library with too!
As you can see, some of us had a a lot of fun with the figures that went inside the jars.  :-)  
We used gofers, gnomes, and lizards to add to our terrariums.  
Enjoy!

Friday, July 12, 2013

No-sew fleece pillow

These pillows are quick and easy to make (with a bit of prep work ahead of time).  
Here is what you will need:
  • Fleece
  • Poly-fil
  • Scissors
  • Ruler
  • Rotary cutter and mats (optional)

These are the tools I used to measure and cut my fabric.  You can do this process with just scissors and a ruler if that is what you have handy.
First you will need to cut 2 squared out of your fleece.  I made mine 15" squares.
(for the library program I will pre-cut all the 15" squares and let the teens do the rest)

Next cut 3" squares out of each corner

Once all corners are cut out of both squares, layer them one on top of the other good sides facing out.  
Cut all sides into 1"wide strips.  You do not need to measure these exactly.  
They will just be used to tie the pillow shut.

Almost there!

Double check that your fabric is facing the correct way (good side facing out).  Begin to tie a simple knot matching the strips together.  Do this to three sides, leaving one side open for the poly-fil.

Three sides tied together!

Stuff your pillow with poly-fil.  I used two large handfuls in mine.  
If you want it to be fluffier just add more poly-fil.

Tie the last side shut and now you have a cute little pillow.  The finished pillow 12"x12" with 3" fringe.  
You can make these bigger or smaller if you desire.
Enjoy!

Thursday, June 27, 2013

DIY Mini Sketchbooks

These adorable mini sketchbooks are made using cereal boxes.  Who loves to recycle? I do!!!  
This project can be done in about 30 minutes, or you can make it shorter by prepping the cover and paper ahead of time.
What you will need:
  • Cereal boxes
  • Exacto knife
  • Scissors
  • Ruler
  • Pencil
  • Paper cutter
  • Paper (any color you like)
  • Liquid glue
  • Glue stick
  • Washi tape (my newest obsession)
First thing: decide how big you want your sketchbook to be.  Mine are 3 3/4 x 3 inches with 1/2 inch at the top for the binding.  So overall I cut a piece of cereal box into an 8x3 inch strip.


Using your ruler, find the middle of the strip and mark with a little line.  I gave my sketchbook 1/2 inch for the binding.  Measure and mark with two lines all the way across.  

Now it's time for the exacto knife. Draw the knife lightly across your lines.  DO NOT cut all the way through the strip.  You want to use little pressure, just enough to help you fold the strip easily.  Bend along the lines to create the top edge.

Cut a stack of paper just slightly smaller than your cover.  For instructions on gluing the pages and cover see my past post on mini notebooks here.

Here's what the sketchbooks look like assembled.  Pretty boring, right?

Of course we need to jazz these up a bit...

That's what we have Washi Tape for!

With the help of the wonderful Robin, we decorated our sketchbooks.  Robin lined hers with hot pink paper just using a glue stick and trimming off the extra paper.  I covered mine in white paper.  Then we dove into the Washi Tape and had a lot of fun.  There were so many patterns to choose from, it took us a bit to decide what to put on our new sketchbooks.  Here's what we came up with:

Enjoy!

Tuesday, June 18, 2013

DIY Button Rings

I must admit that this picture is from an art club I did a few years ago, but plan to do again this year.  The teens had a lot of fun making the rings and they're easy to make.  

Here's what you will need:
  • Buttons (variety)
  • Adjustable ring bases
  • Hot glue gun
Stack buttons on top of each other largest to smallest.  I like the look of 3-4 buttons stacked.  Using the hot glue gun, glue the largest button to the ring base.  Continue to layer the buttons as you like.  You can have a lot of fun arranging the buttons and playing with different colors.  Be careful using the hot glue-it will easily seep through the holes in the buttons.


Enjoy!

Tuesday, May 28, 2013

DIY Magnets

I mentioned in an earlier post about Chic Tags and how they post free tags on Fridays.  I decided to take some of their cute tags and turn them into magnets to add to my chalkboard that is painted on the end of one of our shelving units.

Last week I purchased a sticker/magnet maker (Xyron Creative Station)  using an oh-so-handy 50% off coupon.  Love those things!  I wanted to test out the magnets and this is what I came up with.  It was quick and easy, but I would like to use kid's and teen's art work for an actual program.  Of course, these little magnets add a bit of character to my normally plain board.  

First I cut out my tags.
Ran them through the Creative Station machine,
Cut them out of the magnet leaving an edge so that the laminate would not peel off around the edge of the tag.
And then stuck them on my announcement board! 
(Sorry for the poor quality picture.  Library lighting in this area is not the greatest for pictures)

Thursday, May 16, 2013

Inkodye (Sun-Dyed) Bracelets

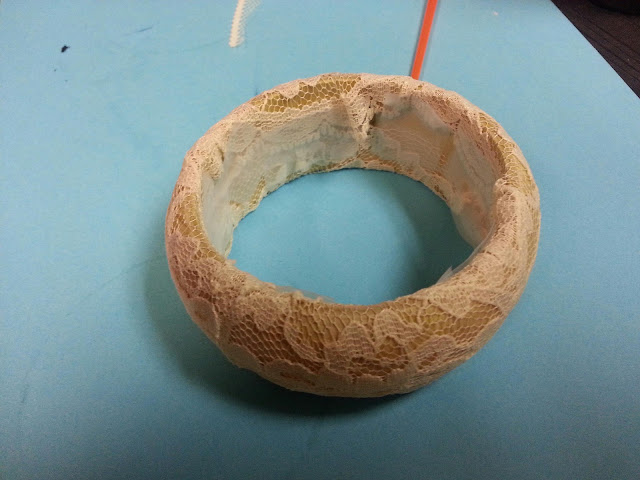
Here is another project that I will be doing with the teens this summer using Inkodye by Lumi.  I used a wooden bangle bracelet as the base.  Be sure there is no finish on the bracelet.  If there is, simply grab some sand paper and sand it off until you have smooth, bare wood.  If there is any finish left on the bracelet it will not allow the dye to soak into the wood leaving bare spots.  

First paint the bracelet with two coats of Inkodye.

We decided to try lace wrapped tightly around the bracelet and taped on the inside.  It's important to get the lace as snug as possible so that the lace pattern will show up in the end.
Now you're ready to sit out in the sun and wait for your ink to develop.  8 minutes for a sunny day 16 minutes for a not so sunny day.
(Smile, Mikayla!)
We weren't satisfied with the coloring on the first try so we brought our bracelets indoors and added another coat of Inkdye right over the lace.
After another 8 minutes in the sun we were happy with the coloring of our bracelets.
Bring the bracelets inside and unwrap the lace.  Ta Da! don't those look great?!  Not done yet.

Next grab some dish detergent and warm water.  Get ready to scrub, scrub, scrub.  Be sure to get all the Inkodye off or else the next time you go outside with your new bracelet it will all turn one color and your design will be lost. 
The color will fade a bit after scrubbing, but look at these beauties!
For another Inkodye project check out this previous post.
 
Enjoy!

Tuesday, May 7, 2013

DIY Mini Note Book

This idea just came to me today while I was staring at my craft supplies hidden in the back corner of the storage room.  I knew that I wanted to do something this summer with the teens using Inkodye.  The stuff is so cool! The dye works with a lot of different materials and the color develops when exposed to the sun.  Who wouldn't want to play with this?!

I decided to make mini note books by upcycling some old cardboard cassette cases the library used to use.  I pulled out the small cassette box from the center which left a nice cover to work with.  The Inkodye website has a lot of project ideas to use.  For this project I decided to use the shadow effect.  

Chick Tags offers free tags on Fridays through Pinterest.  I used the one that says, "Insta Good Time" which can be found here

First I painted the front cover of my notebook using orange Inkodye.  It's important to do this inside away from windows so that the sun doesn't start to develop the ink before you are ready.
Place a tag or any objects on the painted cover and lay it out in the sun for 8 minutes (16 minutes if it is partly cloudy).  


Bring the cover indoors before removing any objects or tags.  Use a damp cloth and dish soapto  scrub the left over Inkodye from the cover and then set it aside.  Be sure to to scrub all over.  Any ink left on the project will develop the next time it is exposed to sunlight.

You can use any kind of paper, I chose to use some bright colors cut the pieces into 5 1/2" x 3 3/4" rectangles.  I cut paper until I had a stack that was 1/2" thick.  Next stack up the paper neatly and use a few binder clips to hold the stack in place.  Using Elmer's Glue and a paint brush apply a couple thick layers of glue to what will be the bound part of the paper.  Let the layers dry in between applications.  
Set aside to dry.

Cut two more pieces of paper slightly larger than the filler paper to cover the insides of the cover.  Use a glue stick so that the paper does not bubble.


Once the Filler paper is mostly dry use the Elmer's Glue and a paint brush to apply a layer of glue on the inside of the cover spine.  Lay your filler paper glue-side down onto the glue coated spine. Use a paper towel to wipe up excess glue.
Close the cover over the filler paper and use binder clips to hold in place.  Make sure your filler paper is pressed tightly against the spine before you clip it shut.  Set your project aside to dry and read a book.

Here's what the final product looks like.


Enjoy!