Showing posts with label Fall. Show all posts

Monday, September 15, 2014

Paper plate owl

This little guy came out way better than I expected.  I will be using this craft for a Fall craft day later this month.  

What you need:
  • Paper plates
  • Markers
  • Construction paper
  • Glue
  • Scissors


Color the center of the paper plate.  I made a simple squiggle pattern alternating with fall colors to make it look like feathers.  Fold the sides of the plate toward the center to make the wings.  Fold the top half of the plate down about an inch and a half.  Glue in place.  
While that has time to dry cut out two large circles and two small circles for the eyes.  I decided to use yellow and black for the eyes.  Cut out a small triangle and feet out of orange construction paper.  Set these aside and color the wings.  I decided to follow the stripes on the paper plate, you can make any design you like.  Glue the eyes, beak, and feet in place.  There you have it, a cute little owl.
Enjoy!

Friday, September 12, 2014

Sparkly Apple Magnet

Here is a quick and fun craft for kids.  I had all the supplies on hand!

What  you need:
  • Red foam: I used a die cut machine to cut mine into an apple shape
  • Green pipe cleaner
  • Green glitter
  • Gold glitter
  • Wiggly eyes
  • Magnetic strip
  • Glue
  • Scissors


Use liquid glue to add gold glitter to the stem of the apple and green glitter to the leaf.  Cut a pipe cleaner in half.  Fold one piece of the pipe cleaner in half to make the head of the worm.  Use the pipe cleaner to carefully poke a hole through the foam.  Slide the piper cleaner through the hole so there is enough hanging out of the back side of the apple to twist in place.  Try to keep the back twist as flat as possible.  Cut any extra pipe cleaner off.  Add a wiggly eye to the worm and a magnetic strip to the back.  That's it.

Enjoy!

Friday, November 1, 2013

Five Little Turkeys Felt Board Story and Printout


FIVE LITTLE TURKEYS 

Five little turkeys standing by the barn door,
One waddled away, and then there were four.
Four little turkeys out under the tree,
One waddled away, and then there were three.
Three little turkeys with nothing to do,
One waddled away, and then there were two.
Two little turkeys in the noonday sun,
One waddled away, and then there was one.
One little turkey better run away,
Soon will come Thanksgiving day.


I made my turkey using a die cut machine and added some color with fabric markers.

(Feel free to print out the sheet below)


Monday, October 28, 2013

5 Little Ghosts Felt Board and Poem

I found the Five Little Ghost poem in Twiggle Magazine and decided to make a felt haunted house and all the characters to go along with it.  Here's what I and two of my clerks, Robin & Mikayla came up with.
Aren't these adorable?!
We started with the Castle and ghosts.
The ghosts can be taken off and put back as needed for the poem.
I can't wait to share this with my Storytime kids!
UPDATE:  I did this in Storytime and the kids loved it.  I passed out the ghosts as we read the poem and had the kids bring them back up to the haunted house as they counted the ghost in the last verse.  We did this a couple times so everyone could have a chance to put something on the board.  On the second time around I passed out the monster, witch, skeleton, spider, and cat and had the kids bring up the item in their hand as they appeared in the poem.  This kept them engaged as well.

Tuesday, October 22, 2013

Paper Mache Pumpkin

I bought small, brown paper mache pumpkins for kids to color with markers and add glitter to for an evetn I did at the library.  I have some leftover pumpkins and have been dreaming up all the fun things I can do with them.  I decided to continue on with the paper mache route and use orange and yellow tissue paper.  

What you need:
  • Orange and yellow tissue paper (or any colors you'd like)
  • Mod Podge
  • Small paint brush
  • Paper mache pumpkin


Cut your tissue paper into one inch strips and then cut the strips into one inch squares.  I did not measure, just a rough guess.  The pieces do not need to be perfect..

Using the small paintbrush add a thin layer of Mod Podge to the pumpkin.  Place a piece of tissue paper on the Mod Podged area and use the paint brush to smooth the paper down.  I started at the top and worked around in a circle until the entire pumpkin was cover.  Once you are satisfied with your pumpkin, give it a nice top coat of Mod Podge to seal everything down.  I used a matte finish on my pumpkin so it's not too shiny.
I'm toying with the idea of adding some chunky glitter to this pumpkin.  Sometimes glitter just adds a nice touch, and by sometimes, I mean all the time!
Enjoy!!

Tuesday, October 15, 2013

Tissue Paper Owl

I got this idea from my favorite blog A Beautiful Mess.  I decided to simplify it a bit and use as a library craft.  After scrounging around in my craft supplies I came up with the following items to make this cute little owl.
  • Styrofoam ball
  • Tissue paper
  • Scrap of felt
  • Large wiggly eyes
  • Pipe cleaners
  • Scissors
  • Glue stick


I cut my tissue paper into 3 inch strips and folded them in half.  I then cut the raw edges with scissors to make a fringe about 1 inch about apart.  Do not cut all the way through.  
Using the glue stick I went around the Styrofoam ball and wrapped the fringe in layers .  For the top, I used smaller pieces of fringe and layered them in a tight circle.  
The feet are made out of  pipe cleaners cut in half .
Cut a small triangle out of brown felt and stick some wiggly eyes on the front of the owl.  Stand back and admire your slightly ruffled, slightly circular owl.
Enjoy!

Monday, September 30, 2013

Felt Bat and Poem

I've seen several posts about bat rhymes which inspired me to make my own.  I had a hard time trying to find a good bat picture to use as a stencil so I made my own.  A picture of the stencil is below.  Feel free to copy and print it out if you'd like. 
I made 5 bats and gave them wiggly eyes.

I decided to use this Bat poem found here.

Bat pattern:  
Enjoy!

Saturday, September 21, 2013

Apple & Worm Magnet

Perfect Fall craft!
Here's a simple, yet cute Fall craft to do with preschool aged kids.  Here in Hilton, NY we have an annual Apple Fest at the beginning of October.  It's a kind of a big deal.  I like to do apple stories right around that time because the kids are all geared up for the Apple Fest.  
Here's what you need:
  • Apple cut outs
  • Red and white card stock 
  • Small worms (I used a clip art worm)
  • Scissors
  • Hole punch
  • Glue
  • Pencil
  • Crayons
  • Magnets
To prep this craft you will need to carefully draw a bite mark out of the side of the red apple.  Cut that out and use your now bitten apple as a stencil for the rest of the apples.  That way your bite will be in the same spot and line up with the white apple when all is said and done.  To make the bite mark on the white apple, use the red cut apple and slide it to the left a little bit so you are cutting a little less out of the white apple.  Line up your apples and make sure it looks alright with the white peeking out a bit.  Go to town stenciling and cutting the rest of the apples. 

Punch a hole in the red apples near the center.  
Cut out small worms that can slide easily into the hole.
Now your project is ready for the kids.

I let the kids color their apples.  Some will color just the stem and leaf, others will make beautiful rainbow colored apples!
Once the kids are done coloring, use a glue stick and dab just a little bit of glue on the back side of the red apple near the hole.  Have the kids slip their worm into the apple and press the worm against the back.
Next, glue the white apple behind the red apple, be sure to try and line up your apples as best as you can.  Add a small magnet strip to the back and your done.
Enjoy!

Tuesday, August 27, 2013

3-D Turkey Cube

Still working on changing up my fall crafts. This 3-D turkey is what I came up with.  I made a 3-D cube out of a cereal box.  Just Google search "3-D cube template"  and you will have many choices and sizes to choose from.  

What you will need:
  • Thin cardboard or an empty cereal box
  • Cube template
  • Pencil
  • Scissors
  • Exacto knife
  • Colored paper
  • Foam (for feet or you can use paper for that too)
  • Fake leaves (or paper ones)
  • Googly eyes
  • Craft glue
How to make this cute little turkey:

Print out a cube template and cut it out.  Trace it onto a piece of cereal box or thin cardboard. Cut out the cardboard cube.  Using the exacto knife, score the edges that will be fold by lightly pressing the knife along those lines.  Be sure not to cut all the way through.  Fold all the edges that need to be folded and with some patience, glue the box together.  Pick out about 5 leaves to use as tail feather.  Layer and glue them together.  Glue your stack of leaves to the back of the cube. NOTE: I used a hot glue gun with my leaves because I didn't have good craft glue handy at the time and regular school glue wasn't cutting it. While your leaves are drying to the box, cut out a beak and gobbler from paper and feet from a piece of foam.  Glue two googly eyes to the front of your cube along with the beak, gobbler, and feet.  Let everything dry for a few minutes and you're done!  Look how cute this square turkey is.  :-)

For the library kids I will have fun fall scrapbook paper to cover the cubes with and crayons to give each turkey a little more personality.
Enjoy!

Wednesday, August 21, 2013

Fall Leaf Crafts


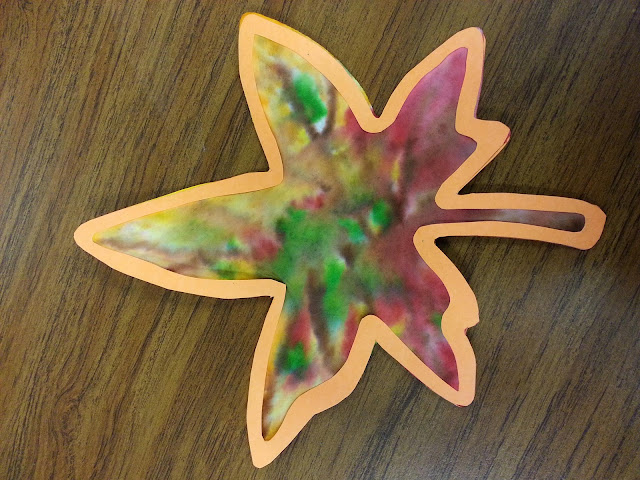
As I was planning my Fall Evening Storytimes, I decided to change things up a bit this year.  I'm working on finding that activity that is just right for my first session. I'm reading books about Fall colors and leaves.  The last two  years I've done Fusion Paper leaves using liquid watercolor.  They always come out great-but they take too long to dry.  Here's what I came up with as alternatives.  
The first is still using my leaf shaped fusion paper (you can also use coffee filters and cut them into the leaf shapes) and markers.  This is fun for the kids because they can color all over the leaf and then mist it with water.  The kids will be entertained as the colors bleed together.  For the frame I cut two leaf shapes out of card stock and glued to either side of the colored leaf.  This method of coloring the leaf dries quickly and comes out nice.

The second leaf  I made with glitter and Mod Podge.  This one is slightly on the messy side because glitter just has a way of getting everywhere! The kids will be given paintbrushes and Mod Podge and work in small sections to cover their leaves with different fall colored glitter.  
Enjoy!

Tuesday, August 13, 2013

Paper Bag Owl

This cute little owl was inspired by this Goody Bag post.  You can find the print out for the face at the link as well.  Using a word document I made ovals for the wings and hearts for the feet.  You can simply draw the shapes and cut them out if you like.

This owl will make a cute centerpiece for Fall or you can fill it with goodies for a Harvest party.  When I make this with the kids I will have some recycled paper to stuff inside the bag to give it a rounder shape.  I will also give the kids a chance to color the bag before it is turned into an owl.
What you need:
  • Small brown paper bags
  • construction paper for wings and feet or shapes printed out
  • Cardstock or thick paper to print the face on
  • Scissors
  • Crayons to color paper bag
  • Stapler
  • Glue sticks
Instructions:
  1. Have kids color their paper bags as they like
  2. Stuff bags with paper or goodies
  3. Fold the top down twice and staple shut
  4. Cut out the face, wings, and feet
  5. Using a glue stick, glue the face to the front of the bag covering the fold
  6. Glue the wings to the sides of the bags and feet to the bottom
  7. Show off your new owl
Enjoy!

Monday, October 22, 2012

Fall Book List for Kids

Here is a small book list of some of my favorite fall books to read to kids.


Fall Book List:

*      Fall, Leaves, Fall! by Zoe Hall
*      Fall Mixed Up by Bob Raczka
*      Leaf Man by Lois Ehlert
*      Apples and Pumpkins by Anne Rockwell
*      Apple Farmer Annie  by Monica Wellington
*      Splat Says Thank You!  By Rob Scotton
*      There Was an Old Lady Who Swallowed Some Leaves!  by Lucille Colandro