Wednesday, August 21, 2013

Fall Leaf Crafts


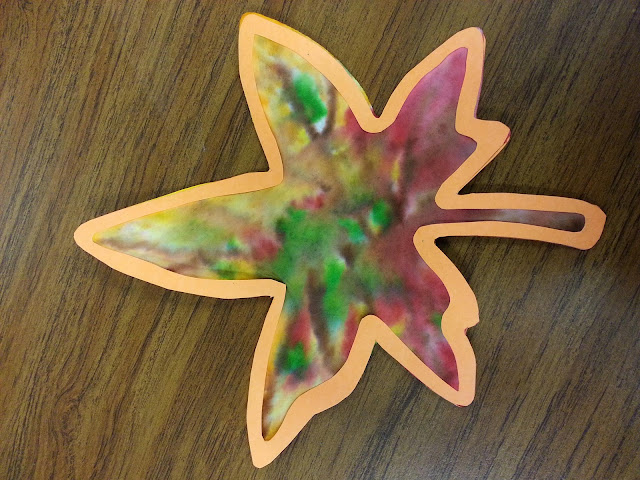
As I was planning my Fall Evening Storytimes, I decided to change things up a bit this year.  I'm working on finding that activity that is just right for my first session. I'm reading books about Fall colors and leaves.  The last two  years I've done Fusion Paper leaves using liquid watercolor.  They always come out great-but they take too long to dry.  Here's what I came up with as alternatives.  
The first is still using my leaf shaped fusion paper (you can also use coffee filters and cut them into the leaf shapes) and markers.  This is fun for the kids because they can color all over the leaf and then mist it with water.  The kids will be entertained as the colors bleed together.  For the frame I cut two leaf shapes out of card stock and glued to either side of the colored leaf.  This method of coloring the leaf dries quickly and comes out nice.
The second leaf  I made with glitter and Mod Podge.  This one is slightly on the messy side because glitter just has a way of getting everywhere! The kids will be given paintbrushes and Mod Podge and work in small sections to cover their leaves with different fall colored glitter.  
Enjoy!

Wednesday, August 14, 2013

Porthole Fish Craft

Who doesn't want to make a paper plate porthole?!  I'm going to be doing a fish themed storytime this fall and I wanted to change up the craft.  I came up with this porthole using paper plates and transparency paper.   With some prep work beforehand this is going to be a fun simple craft for the kids.

What you need:


  • 2 paper plates (one with the center cut out)
  • Transparency paper or plastic wrap
  • Small shells
  • Blue paper or crayons to color background blue
  • Sand (not pictured in sample)
  • Gems or sequins for bubbles
  • Cutouts of fish and seaweed (or have kids draw)  I will be using foam fish stickers for storytime.
  • Silver Sharpie or crayon
  • Glue sticks
  • liquid glue
  • Scotch tape

Here's how to put it all together:
Cut a circle out of the center of one paper plate.  Tape a piece of transparency or plastic wrap tightly over the whole.  This will make your window.  Be sure to place tape on the inside part so you don't see the tape when the plates are glued together. Set this plate aside.
Cut out a blue piece of paper and glue to the top of the other plate, or have children color the other plate blue with a crayon.  I did not have any sand handy when I made my sample, but I will have the kids add a little bit of sand to the bottom of the plate under the seaweed.  Next decorate with seaweed, fish, and shells.  Use glue sticks to glue paper shapes to the blue background.  I used liquid glue to attach the shells.  
For storytime I will have foam fish shapes to use instead of paper cutouts.
Once your fish are in place add some clear gems to make air bubbles.
Now for the fun part.  Using the glue sparingly outline the bottom plate with liquid glue. Place the top plate with the window on top of the bottom plate.  Go around the outside edge gently pressing the two pieces together.
Next add some rivets to the outside plate with a marker or crayon by drawing small circles all around the inside edge.
Now, go show off your beautiful creation.
Enjoy!

Tuesday, August 13, 2013

Paper Bag Owl

This cute little owl was inspired by this Goody Bag post.  You can find the print out for the face at the link as well.  Using a word document I made ovals for the wings and hearts for the feet.  You can simply draw the shapes and cut them out if you like.

This owl will make a cute centerpiece for Fall or you can fill it with goodies for a Harvest party.  When I make this with the kids I will have some recycled paper to stuff inside the bag to give it a rounder shape.  I will also give the kids a chance to color the bag before it is turned into an owl.
What you need:
  • Small brown paper bags
  • construction paper for wings and feet or shapes printed out
  • Cardstock or thick paper to print the face on
  • Scissors
  • Crayons to color paper bag
  • Stapler
  • Glue sticks
Instructions:
  1. Have kids color their paper bags as they like
  2. Stuff bags with paper or goodies
  3. Fold the top down twice and staple shut
  4. Cut out the face, wings, and feet
  5. Using a glue stick, glue the face to the front of the bag covering the fold
  6. Glue the wings to the sides of the bags and feet to the bottom
  7. Show off your new owl
Enjoy!

Tuesday, July 16, 2013

Mason Jar Terrariums

I must be one crazy Librarian to do a project like this, but it was so much fun.  The teens loved it!  It's a bit on the messy side, but the end results are adorable.  For these terrariums I used mason jars and small Cacti.
I was able to purchase the mason jars for about $0.75 each, the Cacti were $2.99 each, and the figurines I had on hand at the library.  Everything else was purchased from a garden store.  
What you will need:
  • Charcoal (for drainage/mold)
  • Soil
  • Small rocks (for drainage)
  • Small plant (I used Cactus)
  • Small figures to place in jar
  • Tongs
  • A lot of patience!

Place a small amount of charcoal at the bottom of the mason jar.  Place a scoop of soil on top of that.  Take a handful of small rocks and put them in next, cover with another scoop of soil.  Remove your plant from any containers and break the roots up.  Using your tongs, place the plant inside the mason jar.  Work it down into the dirt so that the plant can stand up.  Using the tongs again place any figures or other objects (stones,shells, beads, etc.) 
Here is what the teens came up with today.  We made a couple to decorate the library with too!
As you can see, some of us had a a lot of fun with the figures that went inside the jars.  :-)  
We used gofers, gnomes, and lizards to add to our terrariums.  
Enjoy!

Friday, July 12, 2013

No-sew fleece pillow

These pillows are quick and easy to make (with a bit of prep work ahead of time).  
Here is what you will need:
  • Fleece
  • Poly-fil
  • Scissors
  • Ruler
  • Rotary cutter and mats (optional)

These are the tools I used to measure and cut my fabric.  You can do this process with just scissors and a ruler if that is what you have handy.
First you will need to cut 2 squared out of your fleece.  I made mine 15" squares.
(for the library program I will pre-cut all the 15" squares and let the teens do the rest)

Next cut 3" squares out of each corner

Once all corners are cut out of both squares, layer them one on top of the other good sides facing out.  
Cut all sides into 1"wide strips.  You do not need to measure these exactly.  
They will just be used to tie the pillow shut.

Almost there!

Double check that your fabric is facing the correct way (good side facing out).  Begin to tie a simple knot matching the strips together.  Do this to three sides, leaving one side open for the poly-fil.

Three sides tied together!

Stuff your pillow with poly-fil.  I used two large handfuls in mine.  
If you want it to be fluffier just add more poly-fil.

Tie the last side shut and now you have a cute little pillow.  The finished pillow 12"x12" with 3" fringe.  
You can make these bigger or smaller if you desire.
Enjoy!

Thursday, June 27, 2013

DIY Mini Sketchbooks

These adorable mini sketchbooks are made using cereal boxes.  Who loves to recycle? I do!!!  
This project can be done in about 30 minutes, or you can make it shorter by prepping the cover and paper ahead of time.
What you will need:
  • Cereal boxes
  • Exacto knife
  • Scissors
  • Ruler
  • Pencil
  • Paper cutter
  • Paper (any color you like)
  • Liquid glue
  • Glue stick
  • Washi tape (my newest obsession)
First thing: decide how big you want your sketchbook to be.  Mine are 3 3/4 x 3 inches with 1/2 inch at the top for the binding.  So overall I cut a piece of cereal box into an 8x3 inch strip.


Using your ruler, find the middle of the strip and mark with a little line.  I gave my sketchbook 1/2 inch for the binding.  Measure and mark with two lines all the way across.  

Now it's time for the exacto knife. Draw the knife lightly across your lines.  DO NOT cut all the way through the strip.  You want to use little pressure, just enough to help you fold the strip easily.  Bend along the lines to create the top edge.

Cut a stack of paper just slightly smaller than your cover.  For instructions on gluing the pages and cover see my past post on mini notebooks here.

Here's what the sketchbooks look like assembled.  Pretty boring, right?

Of course we need to jazz these up a bit...

That's what we have Washi Tape for!

With the help of the wonderful Robin, we decorated our sketchbooks.  Robin lined hers with hot pink paper just using a glue stick and trimming off the extra paper.  I covered mine in white paper.  Then we dove into the Washi Tape and had a lot of fun.  There were so many patterns to choose from, it took us a bit to decide what to put on our new sketchbooks.  Here's what we came up with:

Enjoy!

Tuesday, June 18, 2013

DIY Button Rings

I must admit that this picture is from an art club I did a few years ago, but plan to do again this year.  The teens had a lot of fun making the rings and they're easy to make.  

Here's what you will need:
  • Buttons (variety)
  • Adjustable ring bases
  • Hot glue gun
Stack buttons on top of each other largest to smallest.  I like the look of 3-4 buttons stacked.  Using the hot glue gun, glue the largest button to the ring base.  Continue to layer the buttons as you like.  You can have a lot of fun arranging the buttons and playing with different colors.  Be careful using the hot glue-it will easily seep through the holes in the buttons.


Enjoy!