Tuesday, May 28, 2013

DIY Magnets

I mentioned in an earlier post about Chic Tags and how they post free tags on Fridays.  I decided to take some of their cute tags and turn them into magnets to add to my chalkboard that is painted on the end of one of our shelving units.

Last week I purchased a sticker/magnet maker (Xyron Creative Station)  using an oh-so-handy 50% off coupon.  Love those things!  I wanted to test out the magnets and this is what I came up with.  It was quick and easy, but I would like to use kid's and teen's art work for an actual program.  Of course, these little magnets add a bit of character to my normally plain board.  

First I cut out my tags.
Ran them through the Creative Station machine,
Cut them out of the magnet leaving an edge so that the laminate would not peel off around the edge of the tag.
And then stuck them on my announcement board! 
(Sorry for the poor quality picture.  Library lighting in this area is not the greatest for pictures)

Thursday, May 16, 2013

Inkodye (Sun-Dyed) Bracelets

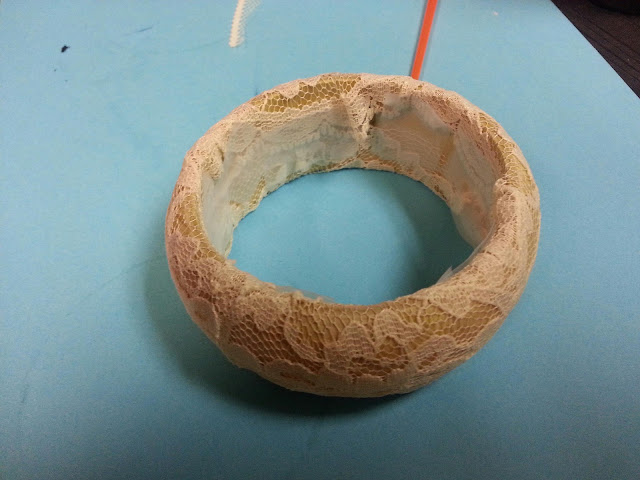
Here is another project that I will be doing with the teens this summer using Inkodye by Lumi.  I used a wooden bangle bracelet as the base.  Be sure there is no finish on the bracelet.  If there is, simply grab some sand paper and sand it off until you have smooth, bare wood.  If there is any finish left on the bracelet it will not allow the dye to soak into the wood leaving bare spots.  

First paint the bracelet with two coats of Inkodye.

We decided to try lace wrapped tightly around the bracelet and taped on the inside.  It's important to get the lace as snug as possible so that the lace pattern will show up in the end.
Now you're ready to sit out in the sun and wait for your ink to develop.  8 minutes for a sunny day 16 minutes for a not so sunny day.
(Smile, Mikayla!)
We weren't satisfied with the coloring on the first try so we brought our bracelets indoors and added another coat of Inkdye right over the lace.
After another 8 minutes in the sun we were happy with the coloring of our bracelets.
Bring the bracelets inside and unwrap the lace.  Ta Da! don't those look great?!  Not done yet.

Next grab some dish detergent and warm water.  Get ready to scrub, scrub, scrub.  Be sure to get all the Inkodye off or else the next time you go outside with your new bracelet it will all turn one color and your design will be lost. 
The color will fade a bit after scrubbing, but look at these beauties!
For another Inkodye project check out this previous post.
 
Enjoy!

Monday, May 13, 2013

The Wonderful Book and Activity

I've been trying to come up with a fun activity to go along with the book: The Wonderful Book by Leonid Gore for Storytime.  This is what I came up with.  I used recycled cassette cases to make the outside covers of a book and then glued pages to the inside.  For a tutorial on how I did this check out this post.  I created a cover  and glued it to the front.  Tonight in Storytime the kids will design their book cover and they can then draw pictures in their book and start creating their own wonderful stories.  I like this activity much better than making bookmarks!  


Tuesday, May 7, 2013

DIY Mini Note Book

This idea just came to me today while I was staring at my craft supplies hidden in the back corner of the storage room.  I knew that I wanted to do something this summer with the teens using Inkodye.  The stuff is so cool! The dye works with a lot of different materials and the color develops when exposed to the sun.  Who wouldn't want to play with this?!

I decided to make mini note books by upcycling some old cardboard cassette cases the library used to use.  I pulled out the small cassette box from the center which left a nice cover to work with.  The Inkodye website has a lot of project ideas to use.  For this project I decided to use the shadow effect.  

Chick Tags offers free tags on Fridays through Pinterest.  I used the one that says, "Insta Good Time" which can be found here

First I painted the front cover of my notebook using orange Inkodye.  It's important to do this inside away from windows so that the sun doesn't start to develop the ink before you are ready.
Place a tag or any objects on the painted cover and lay it out in the sun for 8 minutes (16 minutes if it is partly cloudy).  


Bring the cover indoors before removing any objects or tags.  Use a damp cloth and dish soapto  scrub the left over Inkodye from the cover and then set it aside.  Be sure to to scrub all over.  Any ink left on the project will develop the next time it is exposed to sunlight.

You can use any kind of paper, I chose to use some bright colors cut the pieces into 5 1/2" x 3 3/4" rectangles.  I cut paper until I had a stack that was 1/2" thick.  Next stack up the paper neatly and use a few binder clips to hold the stack in place.  Using Elmer's Glue and a paint brush apply a couple thick layers of glue to what will be the bound part of the paper.  Let the layers dry in between applications.  
Set aside to dry.

Cut two more pieces of paper slightly larger than the filler paper to cover the insides of the cover.  Use a glue stick so that the paper does not bubble.


Once the Filler paper is mostly dry use the Elmer's Glue and a paint brush to apply a layer of glue on the inside of the cover spine.  Lay your filler paper glue-side down onto the glue coated spine. Use a paper towel to wipe up excess glue.
Close the cover over the filler paper and use binder clips to hold in place.  Make sure your filler paper is pressed tightly against the spine before you clip it shut.  Set your project aside to dry and read a book.

Here's what the final product looks like.


Enjoy!

Monday, May 6, 2013

Hatching Chick Farm Craft

I'm going to a preschool visit next week and I always bring a craft with me for the kids to do.  This month's theme for the class is Farming.  I decided to do a variation of the hatching dinosaur egg and turn it into a hatching chick.  
I plan to pair this craft with the book Chicken Soup by Jean Van Leeuwen

For this craft all you need is:
  • 2 small white paper plates
  • Scissors
  • Crayons
  • Markers
  • Glue Stick
  • Paper/felt/card stock etc. (to make your chick)
  • Wiggly eyes
  • Stapler
For detailed instructions on how to make this craft check out the hatching dinosaur egg link above.

Once the craft is complete kids can fold back the flaps and see the baby chick they colored hatch!
For my chick I used an Ellison die 4"Chick
The chick is made out of Smart-Fab which is super fun to work with and decorate.  
It gives this little chick a nice soft look. 
Enjoy!